| Quick Start Guide |
| Community Builder Editor Screen |

There are three main areas of the Editor screen:
- At the top of the window are two rows of buttons, the Navigation
buttons and Header Elements. The Navigation buttons allow you to
go back to Community Builder, view the User Guide or this Quick Start Guide, or view your webpage in
progress.
- The Editor Preview Frame is where you fine-tune the appearance
and position of elements in your web page. A virtually WYSIWYG
(what you see is what you get) view of your web page is displayed here when you
click Save.
- The Properties Frame is where you choose page elements and
formatting elements for your web page.
|
| Inserting an Element |
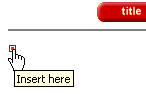 1. Click on an Insert Here button in the
Editor Preview Frame. 1. Click on an Insert Here button in the
Editor Preview Frame.
 2. Select the desired element
from the Elements drop-down list in the Properties Frame. 2. Select the desired element
from the Elements drop-down list in the Properties Frame.
3. Click the Insert
button.  |
| Finding Help |
For context-sensitive Help
on any element or formatting command as you're working, insert the element and then click
on the  in the
element's box in the Editor Preview Frame. For a comprehensive user manual, click on User
Guide in the Navigation Bar. in the
element's box in the Editor Preview Frame. For a comprehensive user manual, click on User
Guide in the Navigation Bar.  |
| Icons |
The following table shows the various
icons that appear in the Editor Preview Frame, and what they mean.
 |
Alignment - Click to edit alignment element |
 |
Anchor - Click to edit anchor (bookmark) element |
 |
Break (New Line) - Click to move or delete line break |
 |
Font - Click to modify font element |
 |
Space - click to move or delete non-breaking space |
 |
General Edit Icon - Click to modify the element in front of icon (eg.
a graphic, text, or hyperlink) |
 |
Insert Here Icon - Click to insert a new element in this location |
|
| Saving Your Changes |
You can make any number of changes in the
Properties Frame, then click the  button. This will save all the changes and display a
WYSIWYG preview of your web page. Remember to save your changes frequently. If you click
on any other icon in the Editor Preview Frame before clicking the button you will lose
any changes you made since the last save. button. This will save all the changes and display a
WYSIWYG preview of your web page. Remember to save your changes frequently. If you click
on any other icon in the Editor Preview Frame before clicking the button you will lose
any changes you made since the last save. |
| Page Title |
 - The first item in the Header Elements is the Page Title of your
web page as it will appear in the title bar of the viewer's browser window. To create a
heading that is displayed within your web page, insert some Text. - The first item in the Header Elements is the Page Title of your
web page as it will appear in the title bar of the viewer's browser window. To create a
heading that is displayed within your web page, insert some Text. |
| Preview Available Choices |
To see a preview
of the available Graphics, Colors, Backgrounds, or Fonts,  the element and then click on
the underlined link in the Properties Frame. the element and then click on
the underlined link in the Properties Frame. 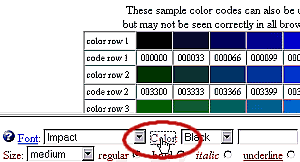
|
| Changing Your Page's Background |
 To
add a background image or change the background color of your web page, click on the
Background button in the Header Elements bar. Select the background image or color, then
click . To
add a background image or change the background color of your web page, click on the
Background button in the Header Elements bar. Select the background image or color, then
click .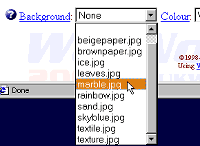
|
| Moving Elements |
To move an item
to a new location on your page, in the Editor Preview Frame first select the element you
want to move by clicking on its Edit Icon. Then click the  or or  button in the Properties Frame until the element is in the
desired location. button in the Properties Frame until the element is in the
desired location. |
| Removing Elements |
To remove an
element from your web page, in the Editor Frame simply highlight the element you want to
delete by clicking on its Edit Icon, then click the  button in the Preview Frame. Important: Deleting an element is a permanent action and cannot be
undone! button in the Preview Frame. Important: Deleting an element is a permanent action and cannot be
undone! |
| Modifying Elements |
| You can always go back to an element or
alignment you inserted earlier, change any of the settings or
even change the name of the graphic or change a hyperlink, click the button again and your
changes will appear in the Preview Frame. |
| Font and Alignment Elements |
| Any Alignment
formatting elements (center, right, left, or justify) will affect any items that follow,
until another Alignment element is inserted. Any Font
element will affect all text and hyperlink elements after it until another Font element is
inserted. |
| View Page |
Clicking on  will display your actual web page in a
new window. will display your actual web page in a
new window. |